버튼과 배지가 하나의 카운터를 공유합니다
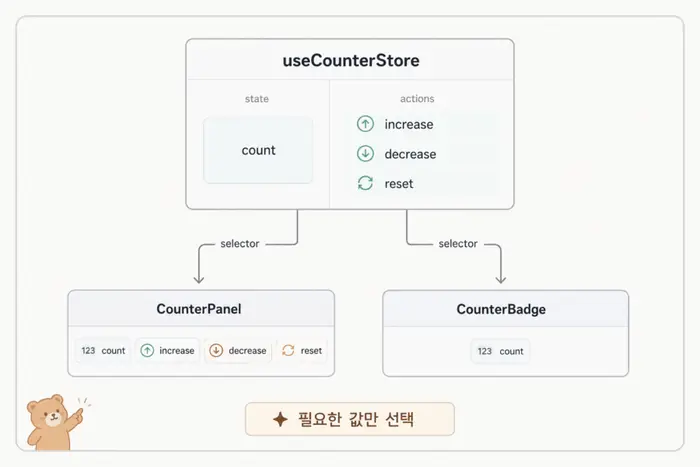
이 실습에서는 버튼 패널과 숫자 배지가 같은 상태를 읽게 만듭니다. +1·-1·초기화를 누르면 두 표시가 함께 바뀝니다. 로그인·관리자 탭·필터·영구 저장은 다음 실습에서 다룹니다.
선수 지식: npm, React 컴포넌트·import, TypeScript 객체 타입.
실습 경로: 현재 ZIP → 전체 코드. 먼저 설명에서 지정한 파일만 읽고, 설정·테스트 파일은 필요한 때 확인하세요.
ZIP을 실행하고 두 숫자를 확인합니다
현재 실습 ZIP을 풀고 package.json이 있는 폴더에서 실행합니다. ZIP에는 Zustand 설정이 포함되어 있어 별도로 추가할 필요가 없습니다.
npm install
npm run dev
Vite가 표시한 로컬 주소를 엽니다. 처음에는 패널에 현재 값: 0, 배지에 카운트 0이 보입니다. +1을 누르면 둘 다 1이 됩니다. 서버를 멈추려면 터미널에서 Ctrl+C를 누릅니다.
세 파일을 순서대로 읽습니다
| 순서 | 파일 | 역할 |
|---|---|---|
| 1 | src/stores/useCounterStore.ts | count와 증가·감소·초기화 함수 |
| 2 | src/components/CounterPanel.tsx | 상태를 읽고 버튼에서 함수를 호출 |
| 3 | src/components/CounterBadge.tsx | 같은 count를 읽어 표시 |
App.tsx와 main.tsx는 두 컴포넌트를 화면에 연결합니다. 설정·README·테스트 파일은 실행에 포함되어 있지만 첫 학습에서 직접 수정할 필요는 없습니다.
Store에 값과 변경 함수를 둡니다
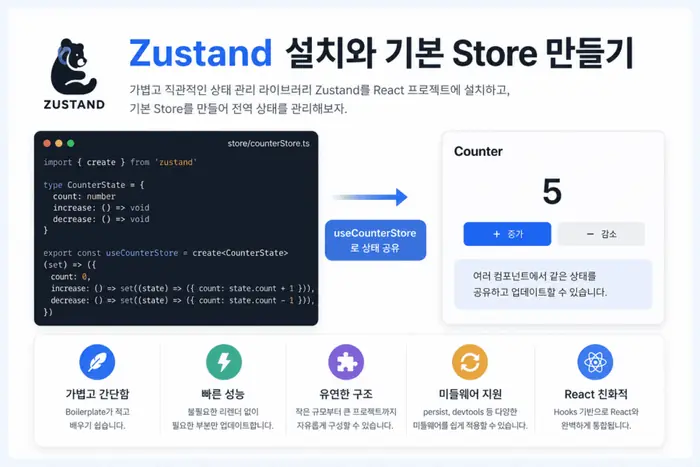
src/stores/useCounterStore.ts의 전체 파일을 확인하세요. create는 컴포넌트가 사용할 Store Hook을 만들고, CounterStore 타입은 값과 함수의 모양을 정합니다. useCounterStore.ts 전체 코드
increase: () => set((state) => ({ count: state.count + 1 })),
reset: () => set({ count: 0 }),
위 두 줄은 Store 객체의 일부입니다. 증가는 이전 값이 필요하므로 함수형 set을 쓰고, 초기화는 0으로 정하는 부분 업데이트입니다. 전체 파일을 복사할 때는 아래 뷰어를 사용하세요.
패널과 배지가 같은 값을 읽습니다
src/components/CounterPanel.tsx는 count와 세 함수를 각각 선택합니다. 이 선택 함수가 selector입니다. 버튼을 누르면 Store를 변경하고, 선택한 count가 바뀌면 화면에 반영됩니다. CounterPanel.tsx 전체 코드
src/components/CounterBadge.tsx는 count만 읽습니다. 별도의 useState나 카운터 Store를 만들지 않으므로 패널과 같은 숫자를 표시합니다. CounterBadge.tsx 전체 코드
실행 프로젝트 전체 코드
현재 실습 ZIP
src/stores/useCounterStore.ts
import { create } from 'zustand';

type CounterStore = {
  count: number;
  increase: () => void;
  decrease: () => void;
  reset: () => void;
};

export const useCounterStore = create<CounterStore>()((set) => ({
  count: 0,
  increase: () => set((state) => ({ count: state.count + 1 })),
  decrease: () => set((state) => ({ count: state.count - 1 })),
  reset: () => set({ count: 0 }),
}));
src/components/CounterPanel.tsx
import { useCounterStore } from '../stores/useCounterStore';

export function CounterPanel() {
  const count = useCounterStore((state) => state.count);
  const increase = useCounterStore((state) => state.increase);
  const decrease = useCounterStore((state) => state.decrease);
  const reset = useCounterStore((state) => state.reset);

  return (
    <section>
      <p>현재 값: {count}</p>
      <button type="button" onClick={decrease}>-1</button>
      <button type="button" onClick={increase}>+1</button>
      <button type="button" onClick={reset}>초기화</button>
    </section>
  );
}
src/components/CounterBadge.tsx
import { useCounterStore } from '../stores/useCounterStore';
export function CounterBadge() {
  const count = useCounterStore((state) => state.count);
  return <span>카운트 {count}</span>;
}
src/App.tsx
import { CounterPanel } from './components/CounterPanel';
import { CounterBadge } from './components/CounterBadge';

export default function App() {
  return (
    <main>
      <h1>Zustand 공유 카운터</h1>
      <CounterPanel />
      <CounterBadge />
    </main>
  );
}
src/main.tsx
import { createRoot } from 'react-dom/client';
import App from './App';
const root = document.getElementById('root');
if (!root) throw new Error('root 요소가 필요합니다.');
createRoot(root).render(<App />);
index.html
<!doctype html>
<html lang="ko">
  <head>
    <meta charset="UTF-8" />
    <meta name="viewport" content="width=device-width, initial-scale=1" />
    <title>Zustand 실습</title>
  </head>
  <body>
    <div id="root"></div>
    <script type="module" src="/src/main.tsx"></script>
  </body>
</html>
package.json
{
  "name": "zustand-counter",
  "private": true,
  "type": "module",
  "scripts": {
    "dev": "vite",
    "build": "tsc --noEmit && vite build",
    "test": "vitest run"
  },
  "dependencies": {
    "react": "19.3.0",
    "react-dom": "19.3.0",
    "zustand": "5.0.15"
  },
  "devDependencies": {
    "typescript": "7.0.2",
    "@types/react": "19.3.0",
    "@types/react-dom": "19.3.0",
    "vite": "8.3.0",
    "vitest": "4.1.11",
    "jsdom": "30.0.1"
  }
}
tsconfig.json
{
  "compilerOptions": {
    "target": "ES2022",
    "module": "ESNext",
    "moduleResolution": "Bundler",
    "jsx": "react-jsx",
    "strict": true,
    "skipLibCheck": true,
    "lib": ["ES2022", "DOM", "DOM.Iterable"],
    "noEmit": true
  },
  "include": ["src"]
}
README.md
# Zustand 공유 카운터

Node.js 24 및 npm을 사용합니다.

```bash
npm install
npm run dev
```

Vite가 출력한 주소를 여세요. +1, -1, 초기화 버튼을 누르면 패널과 배지가 같은 값을 표시합니다. 새로고침하면 0입니다.

## 읽는 순서
1. src/stores/useCounterStore.ts: 상태와 변경 함수
2. src/components/CounterPanel.tsx: 버튼과 상태 구독
3. src/components/CounterBadge.tsx: 같은 상태를 표시

App.tsx와 main.tsx는 화면 연결용이고 설정 및 테스트 파일은 처음에 수정하지 않아도 됩니다.

```bash
npm run build
npm test
```

테스트는 jsdom에서 두 표시의 증가·감소·초기화 동기화를 확인합니다. 실제 브라우저 성능 측정은 포함하지 않습니다.
src/store.test.ts
import { beforeEach, expect, test } from 'vitest';
import { useCounterStore } from './stores/useCounterStore';
beforeEach(() => {
  useCounterStore.setState({ count: 0 });
});
test('증가 감소 초기화가 같은 store에 반영된다', () => {
  let changes = 0;
  const stop = useCounterStore.subscribe(() => changes++);
  useCounterStore.getState().increase();
  useCounterStore.getState().increase();
  useCounterStore.getState().decrease();
  expect(useCounterStore.getState().count).toBe(1);
  useCounterStore.getState().reset();
  expect(useCounterStore.getState().count).toBe(0);
  expect(changes).toBe(4);
  stop();
});
src/App.test.tsx
// @vitest-environment jsdom
import { expect, test } from 'vitest';
import { act } from 'react';
import { createRoot } from 'react-dom/client';
import App from './App';
import { useCounterStore } from './stores/useCounterStore';

(
  globalThis as unknown as { IS_REACT_ACT_ENVIRONMENT: boolean }
).IS_REACT_ACT_ENVIRONMENT = true;
test('두 컴포넌트가 증가와 초기화를 함께 보여 준다', async () => {
  useCounterStore.setState({ count: 0 });
  const host = document.createElement('div');
  document.body.append(host);
  const root = createRoot(host);
  function button(label: string) {
    const found = [...host.querySelectorAll('button')].find(
      (item) => item.textContent?.trim() === label,
    );
    if (!found) throw new Error(`버튼 없음: ${label}`);
    return found;
  }
  try {
    await act(async () => root.render(<App />));
    expect(host.querySelectorAll('button').length).toBe(3);
    await act(async () => button('-1').click());
    expect(host.textContent).toContain('현재 값: -1');
    expect(host.textContent).toContain('카운트 -1');
    await act(async () => button('초기화').click());
    await act(async () => button('+1').click());
    expect(host.textContent).toContain('현재 값: 1');
    expect(host.textContent).toContain('카운트 1');
    await act(async () => button('초기화').click());
    expect(host.textContent).toContain('현재 값: 0');
    expect(host.textContent).toContain('카운트 0');
  } finally {
    await act(async () => root.unmount());
    host.remove();
    useCounterStore.setState({ count: 0 });
  }
});
값이 다르게 보일 때 확인합니다
- 두 컴포넌트의 import가 같은 Store 파일을 가리키는지 확인합니다.
- 컴포넌트는 Hook으로 상태를 구독해야 합니다. getState()로 한 번 읽은 값만 표시하면 이후 변경을 따라가지 않습니다.
- 새로고침으로 0이 되는 것은 정상입니다. 이 실습은 persist를 사용하지 않습니다.
직접 확인하고 다음 단계로 넘어갑니다
| 조작 | 패널과 배지 |
|---|---|
| 처음 실행 | 둘 다 0 |
| +1 두 번 | 둘 다 2 |
| -1 한 번 | 둘 다 1 |
| 초기화 | 둘 다 0 |
| 새로고침 | 둘 다 0 |
확장 과제: Store에 10씩 늘리는 action을 추가하고 패널에 버튼을 연결해 보세요. 배지 파일을 고치지 않아도 값이 함께 바뀌어야 합니다. 다음 state·action 글에서 객체 상태와 변경 책임을 확장합니다.
npm run build
npm test
이번 축소본은 타입 검사·프로덕션 빌드와 자동 테스트 2개를 통과했습니다. 테스트는 jsdom의 클릭과 Store 구독 동작을 검사하며 실제 기기 성능 측정은 아닙니다.
기존 개념 이미지
참고 자료와 다음 학습
- Zustand 학습 순서: store, action, selector, persist까지
- React 처음 배우는 순서: 컴포넌트부터 state, Zustand까지
- Zustand 리렌더링 문제 해결: 상태 변경 후 화면이 바뀌지 않을 때
- Zustand create
- React 상태 공유
- React useSyncExternalStore
연결 학습: 기본 store 연결 완료 기준
목표·선행 지식: create로 store를 만들고 두 컴포넌트가 같은 count를 읽게 합니다.
store 생성은 보통 모듈 범위에 둡니다. 컴포넌트 함수 안에서 매번 새 store를 만들면 서로 다른 인스턴스를 구독할 수 있습니다. 표시 컴포넌트는 count를 선택하고 버튼은 증가 action을 선택하도록 나눕니다.
직접 확인할 과제
두 표시 영역 중 어느 버튼을 눌러도 같은 값이 보이는지 확인하세요. 일반 getState 호출만으로 React 화면의 반응형 구독이 만들어지는 것은 아닙니다.
공통 실습 ZIP · 다음 학습 · 라이브러리 선택 가이드
공통 ZIP은 버전을 고정한 학습 예제입니다. UI 파일은 Radix·Sonner·Embla 기반 축약 구현이며 shadcn CLI 생성물과 동일하지 않습니다. 적용 범위와 실행 방법은 ZIP의 README를 확인하세요.
이 글이 도움이 되었나요?
Zustand 학습 순서
필수 14개 · 전체 15개
읽음 기록 관리
전체 과정 목차 (15개)
- 필수 길잡이 · Zustand 학습 로드맵: store·action·selector·persist 순서
- 필수 길잡이 · React state vs Zustand: 전역 상태가 필요한 기준
- 필수 학습 · Zustand란? React 상태 관리 선택 기준과 기본 Store
- 필수 학습 · Zustand 설치 사용법: 기본 Store 만들고 상태 연결하기 현재 글
- 필수 학습 · Zustand state 사용법: 값 읽기와 변경 흐름 익히기
- 필수 학습 · Zustand action 사용법: 상태 변경 로직을 store로 분리하기
- 필수 학습 · Zustand selector 사용법: 필요한 상태만 가져와 리렌더링 줄이기
- 필수 학습 · Zustand 리렌더링 원리와 selector 최적화 방법
- 필수 학습 · Zustand persist 사용법: 새로고침 후 상태 저장하기
- 필수 학습 · Zustand persist 마이그레이션 기준: 저장된 상태 구조가 바뀔 때
- 선택 참고 · Zustand 상태 변경 후 리렌더링이 안 될 때 해결 방법
- 필수 선수 · Zustand 실무 사용 기준: store가 복잡해질 때 피할 실수
- 필수 학습 · Zustand combine·immer 실습: 타입 추론과 중첩 상태 불변성
- 필수 학습 · Zustand subscribeWithSelector·devtools: 선택 구독과 해제 실습
- 필수 학습 · Zustand Todo 완성 실습: actions·선택 훅·persist 연결
새 글 받아보기
RSS 리더에서 BlogFlow의 새 글을 확인할 수 있습니다.